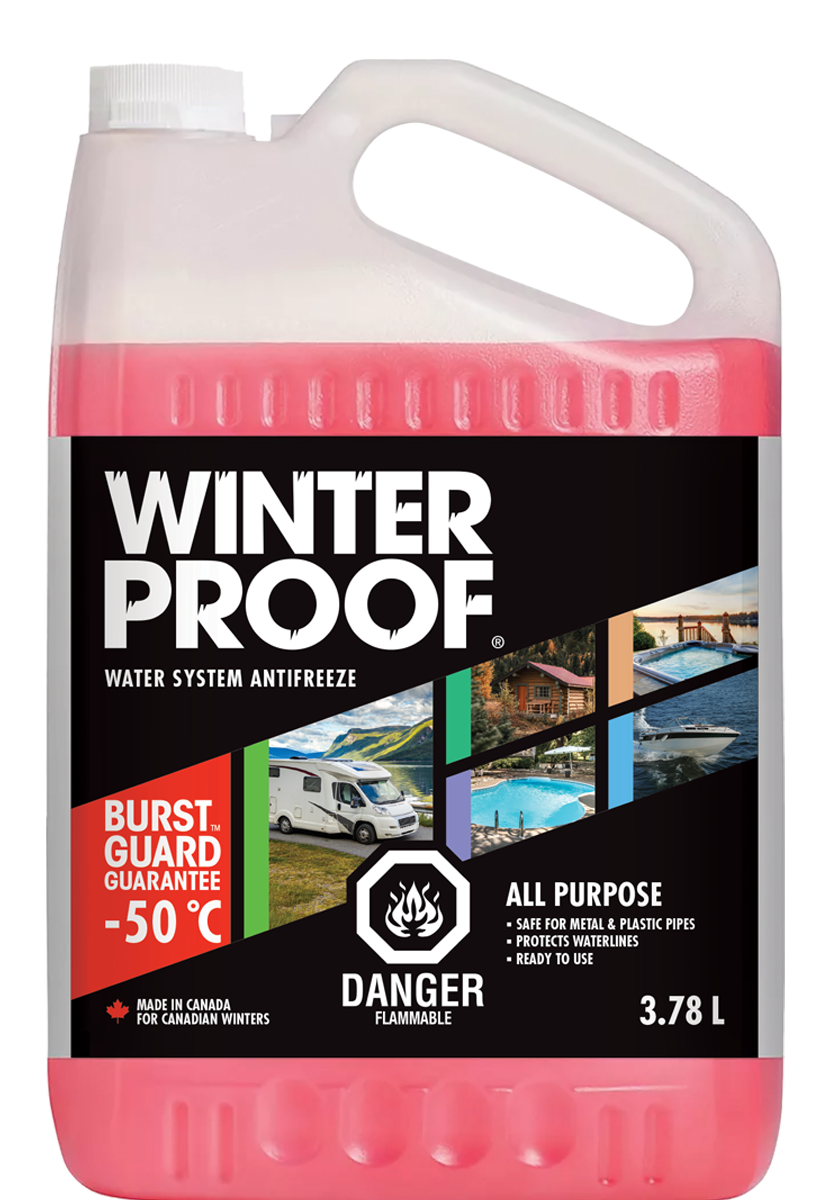
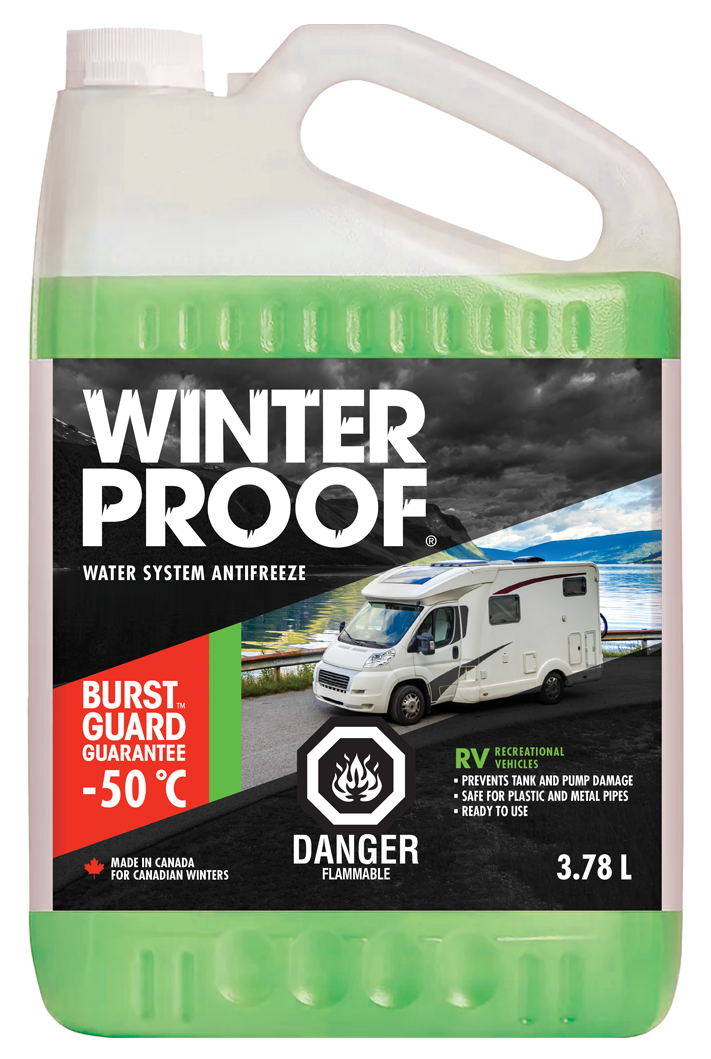
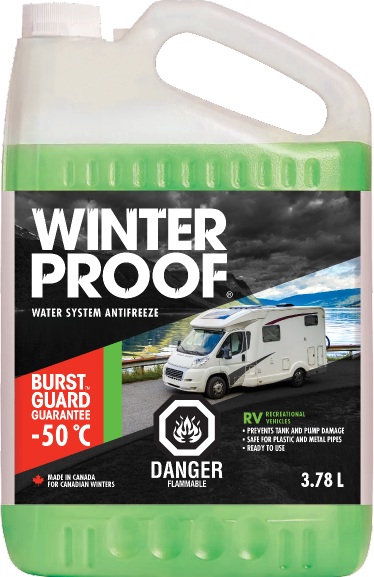
RV Antifreeze

BURST GUARD™ Guarantee -50˚C

Get back on the open road faster! Keep your RV safe from burst pipes and waterlines with WINTERPROOF™ RV Water System Antifreeze.

WHERE TO BUY

Don’t let your plans for a road trip wash away because of burst pipes. Use WINTERPROOF™ RV Water System Antifreeze formulated specifically for RVs to keep your waterlines protected throughout the harsh winter.

Trust Winterproof™

  1. Complete water system protection.
  2. Prevention of burst waterlines.
  3. Safe for use on plastic and metal pipes.
  4. Safe for portable water systems.
  5. Keeps waterlines, pipes, and seals lubricated.
  6. Specialized, ready to use formula.

Made for Canadian winters

How to Winterize Your RV

BEFORE YOU START WINTERIZING, READ THIS

Keep your home on wheels ready for the open road. WINTERPROOF™ with BURST GUARD™ -50˚C Guarantee provides up to 1 year protection from the date of purchase any bursting and cracking up to -50˚C in all your RV pipes and waterlines, when used as per the directions of the RV manufacturer and the directions on the label. Follow these simple steps to keep your RV ready for your next adventure.

Since every RV is different, be sure to follow your owner’s manual before starting the winterization process. Also, remember that some RVs may have extra components, like a washing machine, ice maker, or dishwasher, which may require additional steps to winterize. Follow the steps below that apply to your RV.

Before we begin, it’s important that you know not to dilute the WINTERPROOF™ RV Water System Antifreeze product. Any water remaining in the lines and drains will cause the product to expand and damage waterlines. Bring product to room temperature before using.

1 Drain water system COMPLETELY.

Lower the trailer slightly with the jack to allow better water flow out of the tank.

2 Remove drain plug or tap to empty freshwater tank.

Remove the drain plug on the freshwater tank. This plug is fitted as original equipment. Your RV may already come with a drain valve or tap.

3 Open taps to drain water from the kitchen and bathroom sinks, tub, & toilet.

Open your kitchen sink taps, bathroom sink, and shower taps to empty all remaining water down the drain. Flush the toilet. If you have an outside shower, remember to drain that too.

4 Ensure water heater is turned off.

Make sure your water heater is off. We don’t want to empty the water heater with the propane on and ignite it.

5 Drain water heater. Release pressure & remove anode knob.

Drain the water heater. Locate the water heater on the outside of your trailer and open the cover. Pull up the handle on the pressure relief valve to release any pressure.

6 Apply Teflon tape to threads. Reinsert anode rod.

Re-insert the anode rod after the water heater is empty. It’s a good idea to apply Teflon tape or appropriate fitting compound to the fitting threads to avoid leakage. Re-insert the anode rod and tighten it.

7 Connect sewer line. Drain black & grey water tanks.

Ensure that the black and grey water tanks are empty. Always empty the black water tank first then the grey water tank.

8 Locate water heater & remove access panels.

You will fill the water lines in the trailer with WINTERPROOF™ RV Water System Antifreeze. However, you do not want any antifreeze to enter the water heater.

9 Close cold & hot water valves.

Close both the bottom and top valves to prevent WINTERPROOF™ RV Water System Antifreeze from entering the water heater.

10 Locate freshwater tank & pump suction tube.

Locate the freshwater tank and tube that will allow the pump to suck up antifreeze to winterize the system. If you do not have a suction tube, you can purchase a winterizing kit at an RV service center.

11 Close valve from freshwater tank. Open pump suction line valve.

Close the valve from the freshwater tank so WINTERPROOF™ RV Water System Antifreeze does not enter and then open the valve to the suction tube.

12 Turn on pump for 15 seconds.

Turn on your pump for fifteen seconds to let the pump run dry. Don’t overrun your pump when it’s empty.

13 Turn off all taps in kitchen & bathroom.

Turn off all your taps prior to filling the lines with WINTERPROOF™ RV Water System Antifreeze.

14 Pour product into waterline through the pressurization system or by removing faucet stems. Add product until colour is evident at drain points. Make sure all branch pipes are treated.

Place the suction tube from your winterizing kit into the jug of WINTERPROOF™ RV Water System Antifreeze and turn on the pump. Exchange antifreeze product jugs as they become empty.

15 Turn on taps until antifreeze appears.

Turn on both the cold and hot water taps throughout until WINTERPROOF™ RV Water System Antifreeze appears. You’ll want about 250 ml (1 cup) of plumbing antifreeze to run into the toilet. Open the outside shower to fill this waterline with WINTERPROOF™ RV Water System Antifreeze.

16 Pour WINTERPROOF™ RV Water System Antifreeze into kitchen & shower/bathtub drains.

Pour about 500 mL (2 cups) of WINTERPROOF™ into the kitchen and bathroom sinks and the shower or tub drains. Clean up any spilled antifreeze.

Disclaimer

Under certain circumstances, product may appear slushy or frozen. However, even in extreme temperatures up to -50°C, WINTERPROOF™ RV Water System Antifreeze for Recreational Vehicles (RV) is guaranteed to prevent pipes, waterlines and plumbing system from bursting when used as per the directions of the RV manufacturer and as per directions on the label.

Green coloured dye aids in leak detection.

THIS PRODUCT IS NOT DESIGNED AS A HEAT TRANSFER FLUID FOR CLOSED LOOP SYSTEMS OR AS ANTIFREEZE FOR INTERNAL COMBUSTION ENGINES.

DISPOSAL OF USED WATER SYSTEM ANTIFREEZE: Observe local laws and regulations.

In the event of any inconsistency between the directions on the label and this step-by-step guide, the directions on the label shall prevail.

*The information above and contained in this document is intended to provide general guidelines on winterizing and is provided for informational purposes only. Recochem Inc. assumes no responsibility for the accuracy of the information contained herein and disclaims any liability for the omissions, errors, or outcome of any project. It is the responsibility of the reader to ensure compliance with all applicable laws, rules, codes, and regulations for a project. The reader must always take proper safety precautions and exercise caution when taking on any project. If there is any question or doubt in regards to any element of a project, please consult a licensed professional.

Product Specifications

Item # Unit/Case Pack UPC SCC14
35-624WPRV 3.78 L 05643438356240 40056438356248

BROWSE OUR SPECIALIZED FORMULAS

Tips for Finding MSDS

  1. Have the item # handy before starting the MSDS search
  2. Use the link below to access our MSDS database portal
  3. Select the red SEARCH button on the left-hand side of page
  4. Type item # in the Product Code box and press search (XX-XXXX)
  5. Hover over the yellow MSDS button and select either English or French
Find MSDS