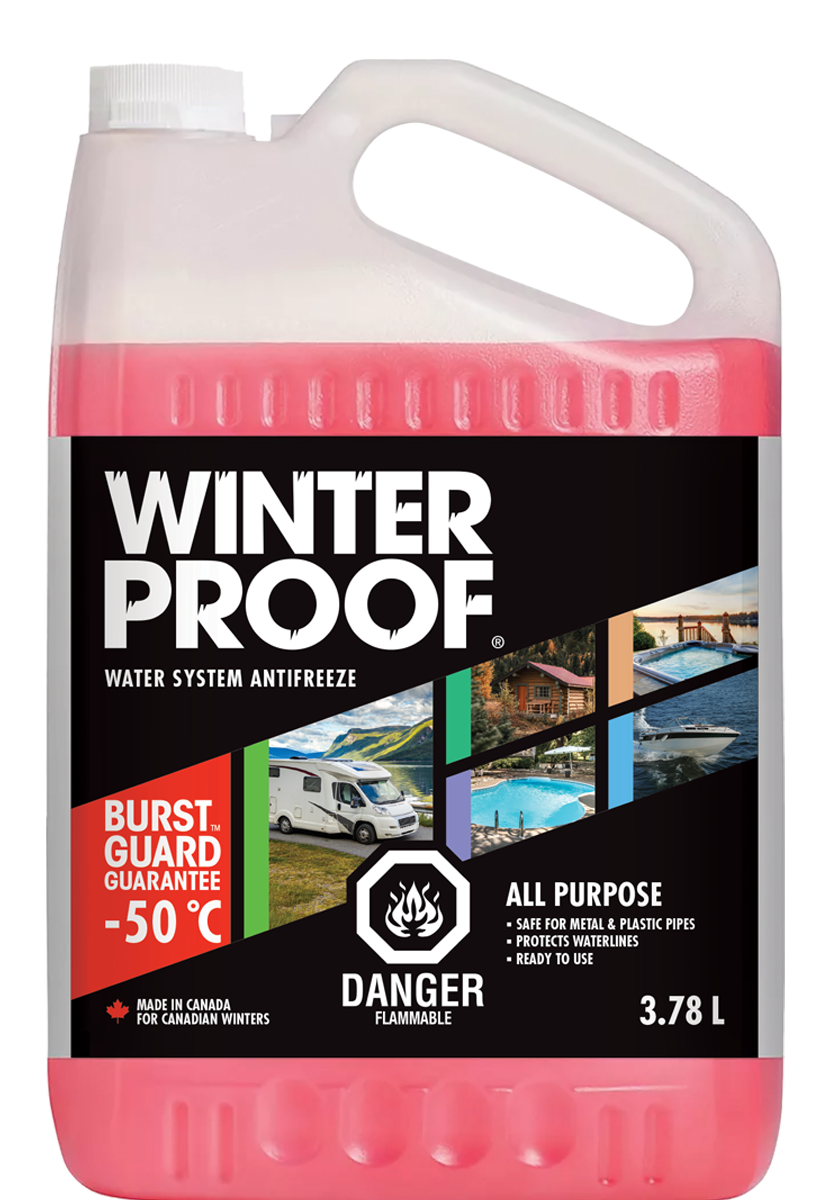
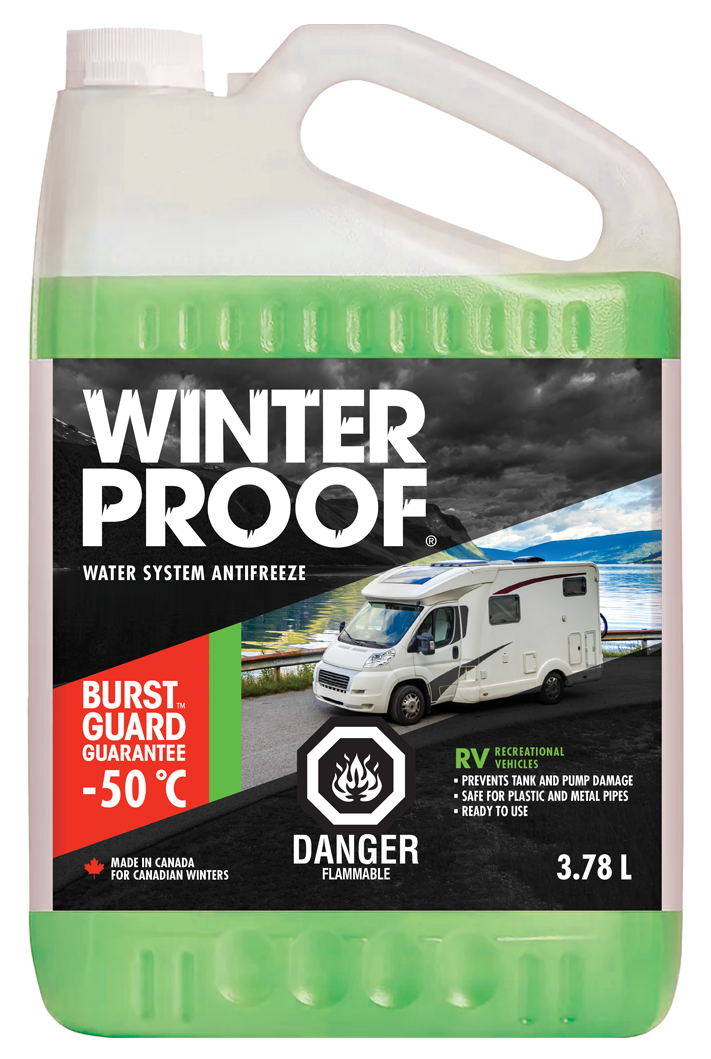
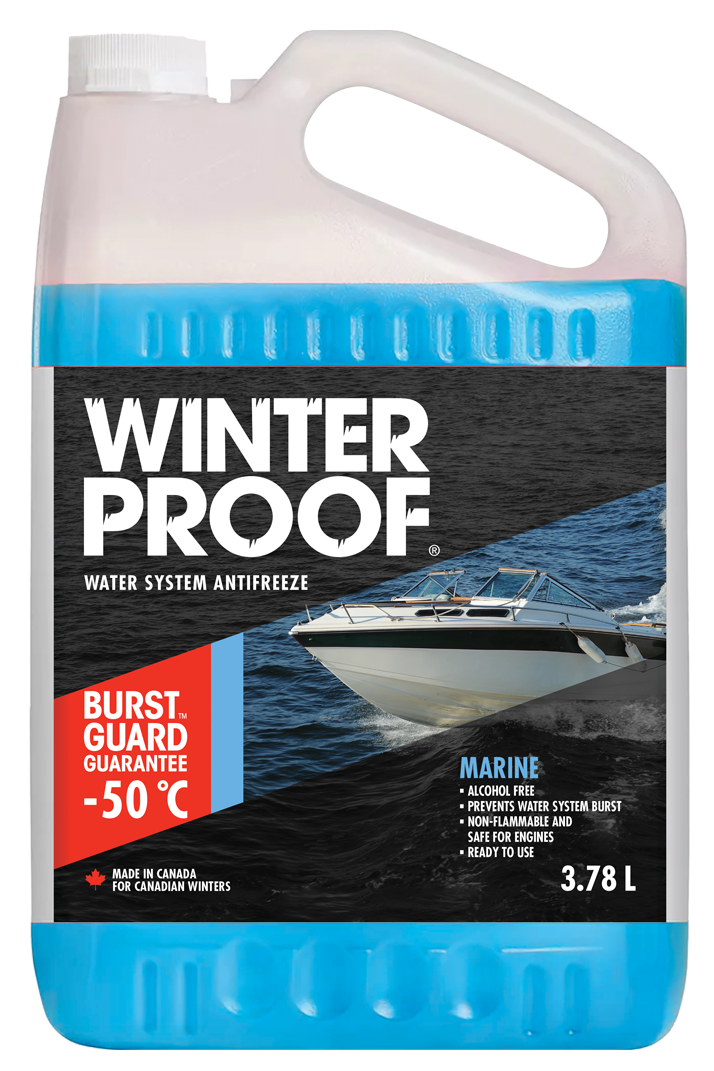
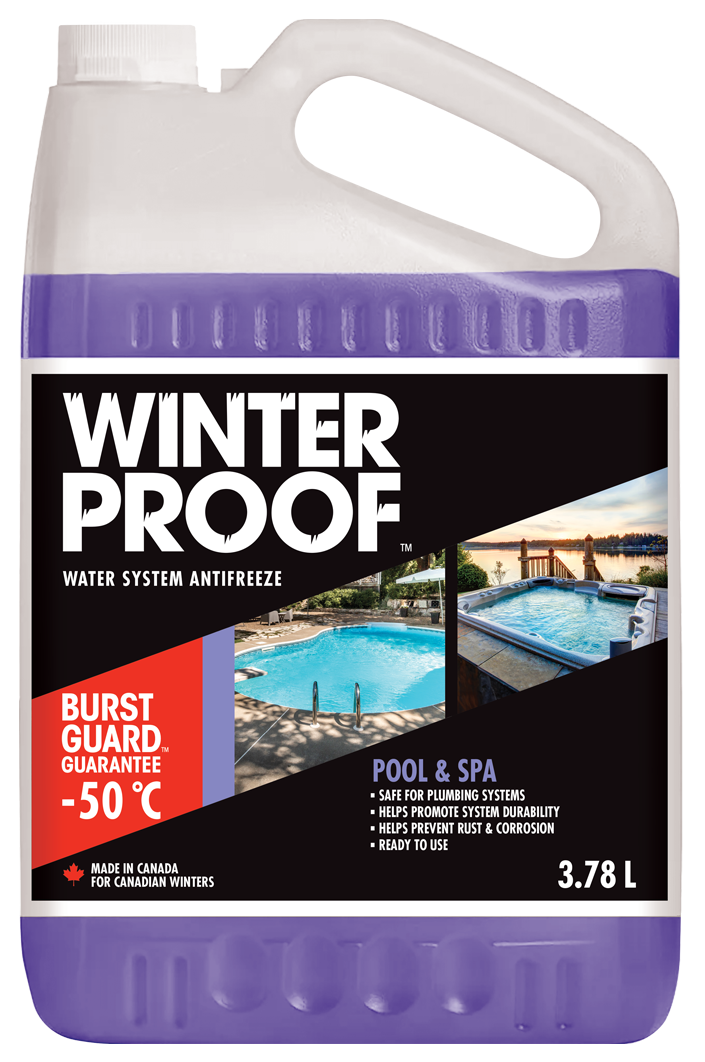
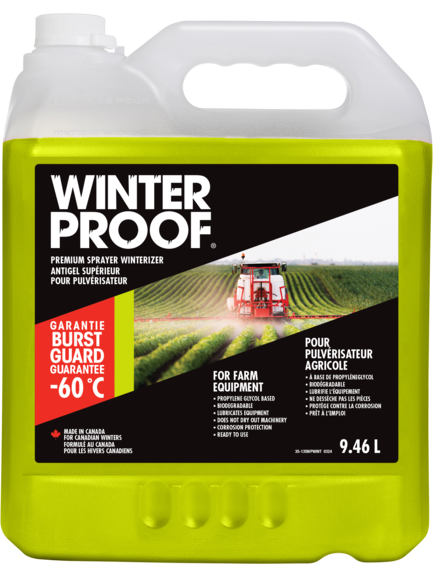
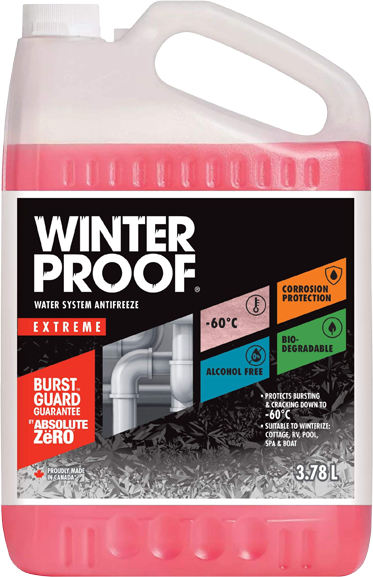
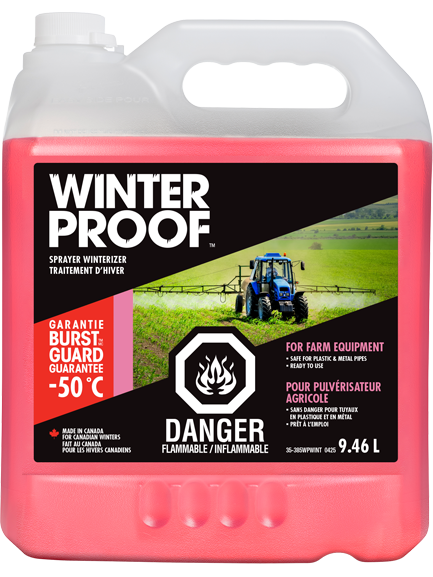
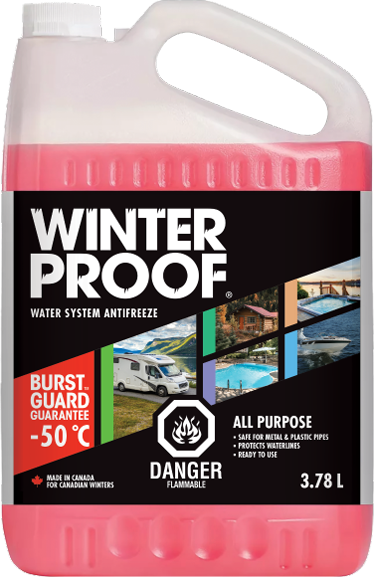
WINTERPROOF™ Water System Antifreeze provides you with peace of mind:
- Formulated for various applications.
- Total water system protection
- Prevents waterline bursts
- Safe for plastic and metal pipes
- Lubricates waterlines, pipes, and seals
- Ready to use formula.

Made for Canadian winters
How To Winterize Your Property
-
Cottage Antifreeze
-
RV Antifreeze
-
Boat Antifreeze
-
Pool Antifreeze
-
Spa Antifreeze

Keep your cottage plumbing system safe through harsh Canadian winters. WINTERPROOF™ with BURST GUARD™ -50˚C Guarantee provides up to 1 year protection from the date of purchase against any bursting and cracking up to -50˚C in all your cottage pipes and waterlines, when used as per the directions on the label. Follow these simple steps to keep your cottage ready for fun days ahead!
Follow the steps below that apply to your cottage.
Before we begin, it’s important that you know not to dilute the WINTERPROOF™ All Purpose Water System Antifreeze product. Any water remaining in the lines and drains will cause the product to expand and damage waterlines. Bring product to room temperature before using.

Turn off the power in the hot water tank to protect the heating elements from trying to warm water that is no longer there.

Ideally, all the supply pipes will drain to one point, and the water supply lines will gradually slope down to a single set of drain valves. If your cottage is set up differently, you may have to crawl under the cottage to find out where all the pipes go and where the valves are located.

Leave all valves and the taps open over the winter so that any remaining water can drain out.

If you think there may still be water in the line from improper drainage or sagging pipes, blow any excess water back through the open taps.

If the pressure tank is located somewhere other than below your cottage, make sure the line to the cottage is also drained. The pressure tank relies on a rubber diaphragm to create and hold the pressure to push water through the plumbing lines. If water is left inside the holding tank, it will freeze and possibly destroy this rubber diaphragm, making the tank useless.

Drain the water between the pump and the pressure or gravity tank. The priming plug should also be removed and stored in a safe place. Add antifreeze until colour is evident at drain points. Make sure all branch pipes are treated. Disconnect the waterline to the pump and pull it onto the shore. Disconnect the foot valve and store it in a secure place to prevent any damage.

A drain valve installed on the waterline just above the lake’s high-water level will let you drain the line from the cottage to where the pipe enters the water, decreasing the chances of freezing and cracking over the winter.

Flush the toilet to get as much of the water out of the tank and bowl as possible. Some water will be left at the bottom that should be removed with a small cup or a sponge. For seasonal homes and cottages, also add 1 L (35.2 fl oz) to each toilet bowl and toilet tank and 250 mL (8.8 fl oz) to all sinks and tub traps. For optimal performance, change the product in water system and plumbing system every year. Make sure the bottom rubber flapper in the toilet tank is tied in the up position to prevent it from sitting in the plumbing antifreeze.

Pour 1 litre down the shower-stall drains. The traps under the drains hold water that prevents sewer gas from coming up through the drains. If left unprotected, the pooled water in the traps may freeze and crack the traps.

Under certain circumstances, product may appear slushy or frozen. However, even in extreme temperatures up to -50°C, WINTERPROOF™ All Purpose Water System Antifreeze is guaranteed to prevent pipes, waterlines and plumbing system from bursting when used as per the directions on the label.
Pink coloured dye aids in leak detection.
THIS PRODUCT IS NOT DESIGNED AS A HEAT TRANSFER FLUID FOR CLOSED LOOP SYSTEMS OR AS ANTIFREEZE FOR INTERNAL COMBUSTION ENGINES.
DISPOSAL OF USED WATER SYSTEM ANTIFREEZE: Observe local laws and regulations.
In the event of any inconsistency between the directions on the label and this step-by-step guide, the directions on the label shall prevail.
*The information above and contained in this document is intended to provide general guidelines on winterizing and is provided for informational purposes only. Recochem Inc. assumes no responsibility for the accuracy of the information contained herein and disclaims any liability for the omissions, errors, or outcome of any project. It is the responsibility of the reader to ensure compliance with all applicable laws, rules, codes, and regulations for a project. The reader must always take proper safety precautions and exercise caution when taking on any project. If there is any question or doubt in regard to any element of a project, please consult a licensed professional.
Download this 10-step checklist for easy reference later!
DOWNLOAD NOW
Keep your home on wheels ready for the open road. WINTERPROOF™ with BURST GUARD™ -50˚C Guarantee provides up to 1 year protection from the date of purchase any bursting and cracking up to -50˚C in all your RV pipes and waterlines, when used as per the directions of the RV manufacturer and the directions on the label. Follow these simple steps to keep your RV ready for your next adventure.
Since every RV is different, be sure to follow your owner’s manual before starting the winterization process. Also, remember that some RVs may have extra components, like a washing machine, ice maker, or dishwasher, which may require additional steps to winterize. Follow the steps below that apply to your RV.
Before we begin, it’s important that you know not to dilute the WINTERPROOF™ RV Water System Antifreeze product. Any water remaining in the lines and drains will cause the product to expand and damage waterlines. Bring product to room temperature before using.

Lower the trailer slightly with the jack to allow better water flow out of the tank.

Remove the drain plug on the freshwater tank. This plug is fitted as original equipment. Your RV may already come with a drain valve or tap.

Open your kitchen sink taps, bathroom sink, and shower taps to empty all remaining water down the drain. Flush the toilet. If you have an outside shower, remember to drain that too.

Make sure your water heater is off. We don’t want to empty the water heater with the propane on and ignite it.

Drain the water heater. Locate the water heater on the outside of your trailer and open the cover. Pull up the handle on the pressure relief valve to release any pressure.

Re-insert the anode rod after the water heater is empty. It’s a good idea to apply Teflon tape or appropriate fitting compound to the fitting threads to avoid leakage. Re-insert the anode rod and tighten it.

Ensure that the black and grey water tanks are empty. Always empty the black water tank first then the grey water tank.

You will fill the water lines in the trailer with WINTERPROOF™ RV Water System Antifreeze. However, you do not want any antifreeze to enter the water heater.

Close both the bottom and top valves to prevent WINTERPROOF™ RV Water System Antifreeze from entering the water heater.

Locate the freshwater tank and tube that will allow the pump to suck up antifreeze to winterize the system. If you do not have a suction tube, you can purchase a winterizing kit at an RV service center.

Close the valve from the freshwater tank so WINTERPROOF™ RV Water System Antifreeze does not enter and then open the valve to the suction tube.

Turn on your pump for fifteen seconds to let the pump run dry. Don’t overrun your pump when it’s empty.

Turn off all your taps prior to filling the lines with WINTERPROOF™ RV Water System Antifreeze.

Place the suction tube from your winterizing kit into the jug of WINTERPROOF™ RV Water System Antifreeze and turn on the pump. Exchange antifreeze product jugs as they become empty.

Turn on both the cold and hot water taps throughout until WINTERPROOF™ RV Water System Antifreeze appears. You’ll want about 250 ml (1 cup) of plumbing antifreeze to run into the toilet. Open the outside shower to fill this waterline with WINTERPROOF™ RV Water System Antifreeze.

Pour about 500 mL (2 cups) of WINTERPROOF™ into the kitchen and bathroom sinks and the shower or tub drains. Clean up any spilled antifreeze.

Under certain circumstances, product may appear slushy or frozen. However, even in extreme temperatures up to -50°C, WINTERPROOF™ RV Water System Antifreeze for Recreational Vehicles (RV) is guaranteed to prevent pipes, waterlines and plumbing system from bursting when used as per the directions of the RV manufacturer and as per directions on the label.
Green coloured dye aids in leak detection.
THIS PRODUCT IS NOT DESIGNED AS A HEAT TRANSFER FLUID FOR CLOSED LOOP SYSTEMS OR AS ANTIFREEZE FOR INTERNAL COMBUSTION ENGINES.
DISPOSAL OF USED WATER SYSTEM ANTIFREEZE: Observe local laws and regulations.
In the event of any inconsistency between the directions on the label and this step-by-step guide, the directions on the label shall prevail.
*The information above and contained in this document is intended to provide general guidelines on winterizing and is provided for informational purposes only. Recochem Inc. assumes no responsibility for the accuracy of the information contained herein and disclaims any liability for the omissions, errors, or outcome of any project. It is the responsibility of the reader to ensure compliance with all applicable laws, rules, codes, and regulations for a project. The reader must always take proper safety precautions and exercise caution when taking on any project. If there is any question or doubt in regards to any element of a project, please consult a licensed professional.
Download our helpful winterizing checklist for easy reference later!
DOWNLOAD NOW
Keep your boat safe through the winter and ready to set sail in the spring. WINTERPROOF™ Marine/Boat Water System Antifreeze with BURST GUARD™ -50˚C Guarantee provides up to 1 year protection from the date of purchase against any bursting and cracking up to -50°C in all your boat’s pipes and waterlines, when used as per the directions of the boat manufacturer and the directions on the label. Follow these simple steps to keep your boat ready for your next marine adventure.
Since every boat is different, be sure to follow your owner's manual before starting the winterization process. Also, remember that some boats may have extra components which may require additional steps to winterize. Follow the steps below that apply to your boat.
Before we begin, it’s important that you know not to dilute the WINTERPROOF™ Marine Water System Antifreeze product. Any water remaining in the lines and drains will cause the product to expand and damage waterlines. Bring product to room temperature before using.

This is a great time to clean your boat and remove all of the built-up dirt, fouling, and other grunge. It’ll be easier to clean it off now, rather than in the spring after it’s had months to sit and solidify on your boat. Our advice? Work your way inside out. Start with the cabin, saloon, etc. and move to the deck, and finally to the hull.
You can also clean and protect any exposed teak and give the topsides and exposed fibreglass a wax to ensure it’s protected over the winter and ready for the open water in the spring!

First, you’ll want to drain the crankcase oil to remove any contaminants that can corrode and damage the engine parts during storage. Before beginning, attach a set of flushing muffs to a garden hose and position them on both sides of the water intake for your motor. Turn on the water source, start your motor and allow it to run for 5-10 minutes to allow the oil to warm up. Next, turn off the motor and remove the flushing muffs.
Follow the manufacturer’s instructions on how to properly drain the oil and change your oil filter. Once the oil has been drained, remove and change your oil filter and fill the crankcase with new oil.

Ensure you know the viscosity and quantity of gear oil that your outbound motor requires. If you don’t know check your owner’s manual.
Place a catch pan under the gear box to capture any oil that drips. Remove the bottom plug, being careful not to remove the gasket along with the plug. Once you see little bit of gear oil drip out, remove the top vent plug. This will allow the gear oil to drain freely out of the bottom hole. In good condition, gear oil should be translucent with a green tint. If water has seeped into the gear box, the oil will have a milky appearance. If you see the latter, contact a service professional for assistance.
To eliminate as much air in the gear box as possible, pump your new gear oil in upward, from the bottom hole until it overflows slightly through the top. For smaller outboard motors, you can press the nozzle of the tube of gear oil into the bottom hole and squeeze slowly into the casing until it overflows out the top. For larger outboard motors, you can follow this same process using a gear oil pump. With either type of motor, once oil overflows through the top vent hole, replace the top plug, remove the tube or pump nozzle and quickly replace the plug.

Add a fuel stabilizer and top up your fuel tank to avoid excess air in your tank. Because air holds moisture, when the temperature drops, the moisture will condense and will end up as water in the bottom of your fuel tank. This can fill your water separator and can cause problems when trying to start your boat in the spring. Follow the manufacturer’s instructions on the bottle of fuel stabilizer you purchase. To run the stabilized fuel through your fuel system, reattach your flushing muffs, turn on your water source, and restart the motor, allowing it to run again for 5 to 10 minutes, then shut it off.
This is also a great time to replace your fuel filter and water separator.

After allowing the motor to run for 5 to 10 minutes, per the previous step’s instructions, shut it off and disconnect the garden hose. Hook up the flushing muffs to a winterizing kit and fill the kit with WINTERPROOF™ Marine Water System Antifreeze.
Remove the cowling to gain access to your boat’s air intakes located at the front of the engine. Open the valve to the winterizing kit and restart your motor and allow the antifreeze solution to drain into the tank. You’ll start to see the antifreeze discharging via the water that exits the motor.
While the engine is running. spray fogging oil into the carburetor(s). You may notice lower horsepower engines stall, and higher horsepower engines will cough and sputter – this is normal. Continue running the motor while spraying a decent amount of fogging oil through the intake. Discontinue the fuel line from the engine and continue to spray fogging oil into the engine until it dies. Doing this will prevent varnish deposits from building up while inactive during the winter.
If your boat has an Electronic Fuel Ignition (EFI), you need to follow a slightly different procedure for fogging. First, ensure that you’re using a fogging solution formulated for EFI motors.

It’s important to winterize your freshwater and wastewater systems to ensure you’re getting all the water out of the pipes and protecting them with WINTERPROOF™ Water System Antifreeze.
To winterize the freshwater systems, simply open all faucets and turn on the freshwater pump, allowing them to run until the freshwater tank is dry. Turn off the pump and pour WINTERPROOF™ Marine Water System Antifreeze into the freshwater tank. Add product until colour is evident. Make sure all branch pipes are treated.
Turn the pump on and pump product through the fixture. Once you see antifreeze coming through the fixture, you can turn the pump off again. Repeat this process for all fixtures and any showers.
To winterize your boat’s wastewater system, first ensure that the holding tank has been pumped. For each head, remove the raw water intake hose from the seacock and put them in a bucket with antifreeze. Flush the head to allow WINTERPROOF™ Water System Antifreeze to run through the lines and to the holding tank. Replace the hose and close the seacock. You should also make sure that all raw water strainers are purged and filled with antifreeze.

If your boat has an oil-injected two-stroke motor, fill the two-stroke oil tank to avoid water condensation build up while in storage.
Finally, squeeze some fresh grease into the pivot tube and tilt tube with a grease gun, and spray a corrosion inhibitor onto the power head and replace the cowl.
Lastly, remove your boat’s propeller and inspect it for damage. Ensure that the shaft is clean and clear of debris, lubricate it with grease, and reinstall the propeller. Store the engine in an upright position to allow any water to drain from it.

Remember to clean out your cabin and interior. Protect from mold and mildew by removing all clothing, cushions, etc. for the winter, and remove all electronics and valuables. To encourage ventilation, open all cabinets, drawers, and doors.
You can place dehumidifiers throughout to soak up any excess moisture, pump out the bilge and apply antifreeze to flush the lines.
Store any batteries that you remove on wood – they’ll lose their charge if stored on concrete.
Remember to cover your boat with a high-quality cover to protect it. A good cover will extend the life of your boat and can reduce the need for expensive maintenance.

Under certain circumstances, product may appear slushy or frozen. However, even in extreme temperatures up to -50°C, WINTERPROOF™ Marine Water System Antifreeze for marine vehicles and boats is guaranteed to prevent pipes, waterlines and plumbing system from bursting when used as per the directions of the boat manufacturer and as per directions on the label.
Blue coloured dye aids in leak detection.
THIS PRODUCT IS NOT DESIGNED AS A HEAT TRANSFER FLUID FOR CLOSED LOOP SYSTEMS OR AS ANTIFREEZE FOR INTERNAL COMBUSTION ENGINES.
DISPOSAL OF USED WATER SYSTEM ANTIFREEZE: Observe local laws and regulations
In the event of any inconsistency between the directions on the label and this step-by-step guide, the directions on the label shall prevail.
*The information above and contained in this document is intended to provide general guidelines on winterizing. Recochem assumes no responsibility for the accuracy of the information contained herein and disclaims any liability for the omissions, errors, or outcome of any project. It is the responsibility of the reader to ensure compliance with all applicable laws, rules, codes, and regulations for a project. The reader must always take proper safety precautions and exercise caution when taking on any project. If there is any question or doubt in regards to any element of a project, please consult a licensed professional.
Download our helpful winterizing checklist for easy reference later!
DOWNLOAD NOWInground Pool

Take care of your pool by getting it ready for winter and protecting it from the cracks caused by the drop in temperature. WINTERPROOF™ with BURST GUARD™ -50˚C Guarantee provides up to 1 year protection from the date of purchase against any bursting and cracking up to -50˚C in all your pool pipes and waterlines, when used as per the directions of the pool manufacturer and the directions on the label. Follow these simple steps to keep your pool in great shape for the warm weather to come – hopefully sooner, rather than later!
Since every pool is different, always follow directions from your pool manufacturer when winterizing your pool. Directions may vary depending on your pool type.
Before we begin, it’s important that you know to not dilute the WINTERPROOF™ Pool Water System Antifreeze product. Any water remaining in the lines and drains will cause the product to expand and damage waterlines. Bring product to room temperature before using.

Begin by skimming the water with a pool skimmer to remove leaves and debris and brush the walls with a pool brush. Clean the skimmer baskets and vacuum all surfaces.

Run the filter system and shock the water a few days before closing. After shocking the pool, check the water balance a few days later. The pH levels should be between 7.2 and 7.6. Increase or decrease pH levels accordingly.

If you have a heater, turn it off. Turn off the filter and set the multi-port valve to BACKWASH. Turn the filter on and let it run for 3-5 minutes, until the water in the site glass is clean. Shut off the system and turn the valve to RINSE. Run the system for 30 seconds and then turn it off. Open the pressure relief valve near the pressure gauge.

Pool plumbing lines should be cleared because water left in the lines can freeze and expand causing the pipes to crack or burst.

Lower the water a few inches below the skimmers or decorative tile. With the filter off, turn the valve to WASTE. Close the skimmer valves and keep the main drain open. Then turn on the filter system until the water reaches the proper level. Turn off the system.

Connect an air compressor to the pool pump. Using low pressure, force out the water in the lines through the skimmer, main drain, and return lines.
Cartridge and Diatomaceous Earth (D.E.) filter systems can be disassembled for winter storage. Sand filters do not need to be taken apart unless you are changing the sand.

If you do not currently have a plug for your pool inlets or need to replace current plugs, you can purchase them at most pool and recreation stores.

Repairs can be extra costly if pool waterlines or drainpipes freeze and burst. Pool antifreeze prevents any water that might be left in the lines from freezing and cracking the pipes. Remove the winterizing plugs in the skimmers. 2-3L of WINTERPROOF™ Water System Antifreeze with BURST GUARD™ -50˚C Guarantee will typically be sufficient to protect your pool waterlines for the winter season.

Remove the rest of the plugs on the filter system. Also remove the site glass and pressure gauge. Store them in the pump strainer basket inside the pump and cover the system.

If your pool has a heater, drain it completely before the first frost to prevent any damage from freezing water in the heater and piping.

Check the cover to make sure it is in good condition. Clear out any pool accessories. Starting at one end of the pool, unfold the tarp and pull it over the pool without it falling in the water. During the off-season, remove any water, leaves, and snow from the cover.

For optimal performance, change the product in the Pool water system and plumbing system every year.
Under certain circumstances, product may appear slushy or frozen. However, even in extreme temperatures up to -50°C, WINTERPROOF™ Water System Antifreeze for Pools is guaranteed to prevent pipes, waterlines and plumbing system from bursting when used as per the directions of the Pool manufacturer and as per directions on the label.
THIS PRODUCT IS NOT DESIGNED AS A HEAT TRANSFER FLUID FOR CLOSED LOOP SYSTEMS OR AS ANTIFREEZE FOR INTERNAL COMBUSTION ENGINES.
DISPOSAL OF USED WATER SYSTEM ANTIFREEZE: Observe local laws and regulations
In the event of any inconsistency between the directions on the label and this step-by-step guide, the directions on the label shall prevail.
*The information above and contained in this document is intended to provide general guidelines on winterizing. Recochem assumes no responsibility for the accuracy of the information contained herein and disclaims any liability for the omissions, errors, or outcome of any project. It is the responsibility of the reader to ensure compliance with all applicable laws, rules, codes, and regulations for a project. The reader must always take proper safety precautions and exercise caution when taking on any project. If there is any question or doubt in regards to any element of a project, please consult a licensed professional.
Above Ground Pool

Take care of your pool by getting it ready for winter and protecting it from the cracks caused by the drop in temperature. WINTERPROOF™ with BURST GUARD™ -50˚C Guarantee provides up to 1 year protection from the date of purchase against any bursting and cracking up to -50˚C in all your pool pipes and waterlines, when used as per the directions of the pool manufacturer and the directions on the label. Follow these simple steps to keep your pool in great shape for the warm weather to come – hopefully sooner, rather than later!
Since every pool is different, always follow directions from your pool manufacturer when winterizing your pool. Directions may vary depending on your pool type.
Before we begin, it’s important that you know to not dilute the WINTERPROOF™ Pool Water System Antifreeze product. Any water remaining in the lines and drains will cause the product to expand and damage waterlines. Bring product to room temperature before using.

Begin by skimming the water with a pool skimmer to remove leaves and debris and brush the walls with a pool brush. Clean the skimmer baskets and vacuum all surfaces.

Run the filter system and shock the water a few days before closing. After shocking the pool, check the water balance a few days later. The pH levels should be between 7.2 and 7.6. Increase or decrease pH levels accordingly.

Pool plumbing lines should be cleared because water left in the lines can freeze and expand causing the pipes to crack or burst.

Lower the water a few inches below the skimmers. With the filter off, turn the valve to WASTE. Close the skimmer valves and keep the main drain open. Then turn on the filter system until the water reaches the proper level. Turn off the system.

Connect an air compressor to the pool pump. Using low pressure, force out the water in the lines through the skimmer, main drain, and return lines.

If you do not currently have a plug for your pool inlets or need to replace current plugs, you can purchase them at most pool and recreation stores.

Repairs can be extra costly if pool waterlines or drainpipes freeze and burst. Pool antifreeze prevents any water that might be left in the lines from freezing and cracking the pipes. Remove the winterizing plugs in the skimmers. 2-3L of WINTERPROOF™ Water System Antifreeze with BURST GUARD™ -50˚C Guarantee will typically be sufficient to protect your pool waterlines for the winter season.

Clean the filter, skimmer, and pump basket. Remove all unused chlorine product from the chlorinator. Spray cartridge filter elements and D.E. (diatomaceous earth) grids with cleaner and rinse with a garden hose. Then backwash the sand filters.

Lower the water level below the returns and skimmer. Do not completely drain above ground pools because hydrostatic pressure can cause damage.

Remove all drain plugs from the pump, filter tank and any other pool equipment. Follow the manufacturers’ instructions for the equipment. Place all drain plugs in a pump basket for easy storage.

Inflate the air pillow or pillows if you have a larger pool. Tie off the pillow or pillows in the center of the pool. Air pillows help to shed water toward the edge of the pool for easy removal. They also allow forming ice to crack inward in order to prevent damage to the pool’s shell or structure.

Pull the winter cover over the pool surface. Secure it with the cable and winch under the top ledge of the pool. In high-wind areas, we suggest using a winter cover seal or plastic wrap material that is wrapped around the pool to prevent the wind from getting under the cover.

For optimal performance, change the product in the Pool water system and plumbing system every year.
Under certain circumstances, product may appear slushy or frozen. However, even in extreme temperatures up to -50°C, WINTERPROOF™ Water System Antifreeze for Pools is guaranteed to prevent pipes, waterlines and plumbing system from bursting when used as per the directions of the Pool manufacturer and as per directions on the label.
Purple coloured dye aids in leak detection.
THIS PRODUCT IS NOT DESIGNED AS A HEAT TRANSFER FLUID FOR CLOSED LOOP SYSTEMS OR AS ANTIFREEZE FOR INTERNAL COMBUSTION ENGINES.
DISPOSAL OF USED WATER SYSTEM ANTIFREEZE: Observe local laws and regulations
In the event of any inconsistency between the directions on the label and this step-by-step guide, the directions on the label shall prevail.
*The information above and contained in this document is intended to provide general guidelines on winterizing. Recochem assumes no responsibility for the accuracy of the information contained herein and disclaims any liability for the omissions, errors, or outcome of any project. It is the responsibility of the reader to ensure compliance with all applicable laws, rules, codes, and regulations for a project. The reader must always take proper safety precautions and exercise caution when taking on any project. If there is any question or doubt in regards to any element of a project, please consult a licensed professional.
How-to winterize inground pool
DOWNLOAD NOWHow-to winterize above ground pool
DOWNLOAD NOW
If you don’t use your hot tub in the winter, then winterizing it properly is crucial. WINTERPROOF™ with BURST GUARD™ -50˚C Guarantee provides up to 1 year protection from the date of purchase against any bursting and cracking up to -50˚C in all your spa pipes and waterlines, when used as per the directions of the hot tub manufacturer and the directions on the label. Follow these simple steps to keep your spa in great shape so you can soak in the bubbles in the warmer weather!
Since every hot tub is different, be sure to follow your owner’s manual before starting the winterization process. Also, remember that some hot tubs may have extra components which may require additional steps to winterize. Follow the steps below that apply to your spa.
Before we begin, it’s important that you know not to dilute the WINTERPROOF™ All Purpose Water System Antifreeze product. Any water remaining in the lines and drains will cause the product to expand and damage waterlines. Bring product to room temperature before using.

Be safe and remember to turn off your power to your hot tub.
Your spa cover needs cleaning too! This is a great time to clean your hot tub cover with a safe cleaner and water.

If you’re going to clean and close your hot tub for the winter, you might as well do a thorough job of it and clear out your filters while you’re at it. Clean out your filter baskets with a safe cleaner and store them inside for the winter if you’re shutting down your hot tub for the season.

Use either your exterior hot tub drain (usually found along the base of the hot tub) – or if your spa doesn’t have one, you can use a submersible pump – to drain the water. First, remove the drain cap and attach a hose or piping to direct water to an area of your property that will allow it to easily flow and disperse. Once the water inside the tub is drained, leave the drain spout open.

If your hot tub has valves on the top, unthread the valves and insert a shop vacuum to blow water out through the jets. Run the shop vacuum through each of the valves until you don’t see anymore water coming through the jets.
If your spa does not offer top valve access to the pipes, locate the pumps and loosen the unions, opening the plumbing pipes. Use a shop vacuum to blow water through the plumbing pipes and jets.

Even small amounts of water left behind in your spa can cause cracks, so it’s important to try to get all of the water out of it. Use a shop vacuum or a sump pump to suck or pump the remaining water out of the footwell and seats, while using a shop vacuum to blow out the remaining water in the jets. Hold the shop vacuum over each jet for about 15-20 seconds.

Use our WINTERPROOF™ Water System Antifreeze, as directed on the product label. Add antifreeze until colour is evident at drain points. Make sure all branch pipes are treated.

Once you’re done, remember to place the cover back onto your spa for the season.

Under certain circumstances, product may appear slushy or frozen. However, even in extreme temperatures up to -50°C, WINTERPROOF™ All Purpose Water System Antifreeze is guaranteed to prevent pipes, waterlines and plumbing system from bursting when used as per the directions on the label.
Pink coloured dye aids in leak detection.
THIS PRODUCT IS NOT DESIGNED AS A HEAT TRANSFER FLUID FOR CLOSED LOOP SYSTEMS OR AS ANTIFREEZE FOR INTERNAL COMBUSTION ENGINES.
DISPOSAL OF USED WATER SYSTEM ANTIFREEZE: Observe local laws and regulations
In the event of any inconsistency between the directions on the label and this step-by-step guide, the directions on the label shall prevail.
*The information above and contained in this document is intended to provide general guidelines on winterizing and is provided for informational purposes only. Recochem Inc. assumes no responsibility for the accuracy of the information contained herein and disclaims any liability for the omissions, errors, or outcome of any project. It is the responsibility of the reader to ensure compliance with all applicable laws, rules, codes, and regulations for a project. The reader must always take proper safety precautions and exercise caution when taking on any project. If there is any question or doubt in regards to any element of a project, please consult a licensed professional.
Download our helpful winterizing checklist for easy reference later!
DOWNLOAD NOWProduct Specifications
Item # | Unit/Case Pack | UPC | SCC14 |
---|---|---|---|
35-364WP | 3.78 L | O56438907268 | 40056438907266 |
35-365WP | 9.46 L | O56438907275 | 50056438907270 |
35-368WP | 18.9 L | 056438909538 | NA |